jeudi 20 février 2014

( It’s a Miracle! ) Yellow Butter Vanilla Cake

source: http://www.threelittleblackbirds.com/2011/12/yellow-butter-vanilla-cake/

(Makes 3-9 inch rounds, one half sheet cake, or 3 dozen cupcakes.  Recipe can be scaled in half if necessary)
Printable Recipe
339 g (1 ½ cups) unsalted butter, softened
452 g (2 ¼ cups) superfine or bakers sugar (I use organic cane sugar ground fine in a food processor)
5 large eggs room temp
1 tablespoon pure vanilla extract
2 teaspoons sweet sherry cooking wine or madeira
405 g unbleached all-purpose flour – (I use organic unbleached soft wheat flour)
25 g potato starch (if using bleached a/p flour  or cake flour – omit this and add 25 g more flour)
1 tablespoon baking powder
½ teaspoon baking soda
3/4 teaspoon kosher salt
296 ml (1 1/4 cups) buttermilk
8 ounces (1 cup) sour cream
Instructions:
Turn oven on to 350 degrees. Place oven rack in the middle of the oven.
Generously butter the pans then place parchment paper (cut to fit) on the bottom of the pan only. BTW: I am making a 6 inch, 3 layer cake for this blog which will leave lots of batter left over for cupcakes.  For most of my cakes, I bake in 3 inch high cake pans and tort them (cut them into layers) after they are cooled and semi-frozen.  For this recipe, however, you want the shortest amount of baking time to keep the cake moist and tender.  For this reason, I bake this cake in single layers, which means more pans to butter and parchment.  In the end, the extra work is definitely worth it. Alternatively, you can also bake this recipe in a half sheet pan and then cut your layers out of that (works well for smaller cakes), and then you are only dealing with one pan.
To cut the parchment paper to fit: Place the cake pan on top of a sheet of parchment paper, using a pencil draw around the edge of the pan. Cut out with scissors and place the paper pencil side down into the buttered pan. Set the pan(s) aside.
Have all of your ingredients ready.  Remove the sour cream and buttermilk from the fridge and set on counter to warm up just a bit.  Make sure your butter is room temperature and measure out amounts on a scale or by volume.
It’s very important that your eggs be room temperature so they don’t turn the butter cold when incorporated and produce lumps (which can cause large air bubbles in your cake).  I never take my eggs out to warm up before hand however.  Instead, I remove my eggs cold from the fridge, place the eggs into a bowl and cover with warm water while I prepare the batter.  By the time I need them, they are room temp.
In your mixer fitted with the paddle attachment, beat the butter and the sugar together.
TLB Tip: Don’t rush this important step. I usually mix for a minimum of 5 minutes. Start on low speed until the butter and sugar are well combined then crank the mixing speed up to medium high and let it go until light in color and very fluffy. You want to incorporate a lot of air here so that the texture of the cake will be light and airy. If you rush this, the cake will be dense and thick.
While the butter is beating, sift together the flour, potato starch, baking powder and baking soda into a bowl.  Scoop most of the flour mixture back into the strainer and sift one more time.  Add the kosher salt and set aside.
Add the sherry to the butter and sugar mixture and mix well, scraping the bowl as often as needed.
Next, add in the eggs one at a time, scraping the bowl often.
TLB Tip: When a recipe says to add the eggs one at a time, it really means one at a time.  Again, don’t rush this.  Add the egg and mix completely until no streaks of the egg remain.  Stop the mixer and scrape the bowl and paddle down after each addition of egg.  The eggs need their time to emulsify so they can build stability in your cake when baked.
Add the flour mixture to butter mixture on low speed alternating with the buttermilk (mixed together with the vanilla and lemon zest), starting and ending with flour.
TLB Tip: Now is the time to keep the mixer on low speed and never any higher.  We want to keep the gluten levels as low as possible to keep the cake tender.  Once the flour hits the butter, mix only until half way incorporated before adding the buttermilk.  You will still see flour that hasn’t mixed in yet and that is okay because we will render that in the next step.
Remove the bowl from the mixer and scrape off any residual batter/flour from the paddle.  Scrape down the bowl, add the sour cream and fold/stir in the sour cream by hand.
Keep mixing and folding until sour cream is completely mixed in and batter is nice and smooth, making sure to reach down to the bottom of the bowl with the rubber spatula and fold upwards.
Divide batter evenly among pans, lightly tap pans once against the counter to dislodge any large air bubbles and settle the batter.
Bake the cakes until the tops spring back just slightly when touched in the center and a toothpick comes out clean.  About 20-25 minutes depending on your oven and cake size. Start testing for doneness 3 minutes before timer beeps and watch the cakes carefully. Do not overbake.
TLB Tip: When you can smell the delicious buttery aroma of these cakes baking, it’s time to start testing for doneness.  Cakes will let you know, by smell, when they are done cooking. They might not always be done, and you can put them back in for a few more minutes and watch them carefully. But this way, you will not over bake them.
Cool cakes in their pans for 20 min (set a timer). After 20 minutes, cakes will still be warm to the touch, which is what you want.
Place a layer of plastic wrap over the cake still in the pan…
Place a cooling rack over the cake…
With one hand on the bottom of the cake pan and the other on top of the cooling rack, carefully invert the cake over to its bottom…
Carefully lift off the cake pan, and gently peel off the parchment paper…
Wrap the cake with the over hanging plastic wrap and then one more layer of plastic, being careful not to wrap too tight and cause the edges of the cake to be misshapen. Place cakes in the freezer while you clean up and prepare the frosting (this will make the cakes easier to trim, level, tort or shape).
If you will be leaving the cakes in the freezer for an extended time, wrap the cakes again in tin foil over the plastic wrap to prevent freezer burn.  Cakes can be kept frozen for up to 4 months.
BTW: This recipe also makes fantastic cupcakes…
Light, fluffy, moist, buttery, tender…delicious!
FAQ: Is Potato Flour the same thing as Potato Starch? The answer? No!
Potato Starch is a very fine “flour” with a bland taste, that is made by removing the potato peel, made into a slurry and watery mix, then dehydrated to form Potato Starch. The Potato Starch is not cooked, thus it does not absorb much water.
Potato Flour is heavy with a definite potato flavor made from the actual potato including the potato skin and will absorb large amounts of water because it has been cooked and contains the peel. It is not used as main flour in baking as it would absorb too much liquid and make the product gummy.

dimanche 9 février 2014

Chocolate Peanut Butter Cupcakes

source: http://www.bakerella.com/chocolate-peanut-butter-cupcakes/

Servings: 18 cupcakes

Ingredients

  • CHOCOLATE CUPCAKES
  • 1 1/2 cups all-purpose flour
  • 2/3 cup cocoa
  • 1 1/3 cups sugar
  • 1 teaspoon baking soda
  • 1/2 teaspoon baking powder
  • 1/2 teaspoon salt
  • 2 eggs
  • 1/3 cup oil
  • 1 teaspoon vanilla
  • 2/3 cup milk
  • 2/3 cup hot water
  • PEANUT BUTTER COOKIES
  • 1/2 cup butter, room temperature
  • 1/2 cup sugar
  • 1/2 cup packed brown sugar
  • 2/3 cup creamy peanut butter
  • 1 egg
  • 1 teaspoon vanilla
  • 1 1/4 cup all-purpose flour
  • 1/2 teaspoon baking soda
  • 1/2 teaspoon baking powder
  • 1/4 teaspoon salt
  • 8 oz. peanut butter chips
  • FROSTINGS
  • 1 cup butter, room temperature
  • 2/3 cup creamy peanut butter
  • 4 cups confectioners sugar
  • 1/4 cup cocoa
  • 2 Tablespoons milk

Instructions

  1. FOR CUPCAKES: Preheat oven to 350 degrees.
  2. Fill cupcake tray with cupcake liners.
  3. In a large bowl, mix dry ingredients together with a wire whisk. Add eggs, oil, vanilla and milk and mix until combined. Add hot water and mix. It will be very liquid.
  4. Fill cupcake liners about 2/3 full. Pour into liner with a large spouted measuring cup for ease.
  5. Bake for 15 minutes or until done. Cool and make the cookies.
  6. FOR COOKIES: Note: You can make these ahead of time.
  7. Beat butter and sugars for 3-4 minutes until creamy. Add the peanut butter, egg and vanilla and mix until combined.
  8. In another bowl, stir the dry ingredients with a wire whisk and then add to the peanut butter mixture and stir until combined.
  9. Wrap dough in plastic wrap and refrigerate for a few hours or overnight.
  10. Preheat oven to 350 degrees. Roll dough into small balls about an inch or so in diameter. Chill again if necessary and then roll in peanut butter chips.
  11. Place on a parchment lined baking sheet and bake for 10-14 minutes. Cool.
  12. FROSTINGS: For chocolate frosting, beat 1/2 cup butter until creamy. Add 1 teaspoon vanilla and mix. Slowly add 2 cups confectioner's sugar and cocoa and mix until combined. Add 1 Tablespoon milk and mix until creamy and smooth. For peanut butter frosting, beat 1/2 cup butter and 2/3 cup peanut butter until creamy. Add 1 teaspoon vanilla and mix. Slowly add 2 cups confectioners sugar and mix until combined. Add 1 Tablespoon milk and mix until creamy and smooth. Fill a decorator bag fitted with a 1M tip with chocolate frosting on one half and peanut butter frosting on the other. Squeeze bag to force frosting into the tip and swirl frosting on cupcakes. Top with a little peanut butter cookie.
Source: Bakerella.com
Chocolate Peanut Butter Cupcakes
The first thing I unpacked though were my baking pans. A good place to start. Especially since I have a new oven to work. One 18 years newer than my last one. Yikes and Yay! I was actually kind of nervous … like meeting someone new and hoping you’ll be good friends. But you have to hang out together for a while first to find out.
Ingredients
So, I decided to break the ice with a cupcake recipe I make all the time. I thought it would be a good way to see how it compares to my old oven in terms of baking times and such.
Baking
So far so good.
Chocolate Cupcakes
Really good!
Peanut Butter
And I made chocolate and peanut butter frostings to go with it.
Creamy
And whipped up some peanut butter cookies to go on top of it.
Chocolate Peanut Butter Cupcakes
But, that was really just an excuse for me to try out some basic cookies in the oven, too.
So I stuck them on top of the cupcakes.
Peanut Butter Chips
I rolled chilled cookie dough into small balls and then rolled balls with peanut butter chips in my hand, instead of stirring them into the dough to make sure each little cookie was well covered in chips.
Frostings
Oh… and the frosting. Peanut butter and chocolate. I’m easy.
Place a decorator bag fitted with a 1M tip into a large glass and spoon even amounts of chocolate and peanut butter frosting on each side.
Frosting
Fill the bag, twist off the end and squeeze evenly until the frostings fill the tip.
IMG_0346
Then pipe pretty swirls.
Chocolate Peanut Butter Cupcake
And put a cookie in it.
Chocolate Peanut Butter Cupcakes
And then take it out and eat the cookie.
Chocolate Peanut Butter Cupcakes
And then eat the cupcake.
Cupcake Wrappers
And then keep eating. I mean share with friends.

Quick and Easy Creepy Cupcakes

source: http://www.bakerella.com/quick-and-easy-creepy-cupcakes/

Chocolate Cupcakes
Just bake up your favorite cupcakes. I used this easy chocolate cupcake recipe.
Orange frosting
You’ll totally need some frosting, too. Color it orange, purple, black, green or just leave it white.
Plastic Spiders
And then you’ll need the creepiest plastic spiders you can find.
Creepy
I like these long-legged little guys a lot. Eeek!
I’ve been dying to use them on something since I bought them a while ago. Of course, Halloween cupcakes were perfect.
Unfortunately, I have no memory of where I picked them up, but if you’re looking for some plastic spiders – start with dollar stores or craft stores. Or any of those pop-up Halloween shops. They’d probably have something.
Chocolate cupcakes
Now you can make your cupcakes super easy by just frosting them with one color.
Spider Cupcake
And perching your creepy spider right on top.
I think they’d look pretty sharp in solid white frosting, too.
Easy Creepy Spiders
But I wanted them a little snazzier – so I made them with white sugared webs.
Decorating Cupcakes
Reserve some of your frosting before tinting it a color and use it to pipe three circles on top of the cupcake.
Just use a ziploc bag with the corner snipped off to pipe if you don’t have a decorator bag or icing tip.
A. Then drag a toothpick through the icing starting from the center and moving towards the edge of the cupcake to create the web.
or
B. Dip the top of the frosted and piped cupcake in a small bowl of white sanding sugar to coat and then drag a toothpick through. I think this makes them a little prettier and it flattens the web into the frosting so it doesn’t look like it’s sitting on top of it. If you need to adjust the web shape, you can do so easily by nudging the sprinkle coated surface a bit.
Spider Cupcakes

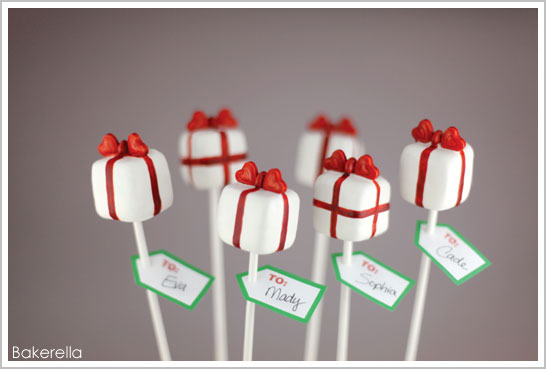
PRETTY PRESENTS

source: http://thecakeblog.com/2012/12/bakerella-diy-interview.html

a DIY by Bakerella
(makes 48 pops)
Supplies:
  • 48 uncoated cake balls
  • Wax paper
  • Baking sheet
  • Cookie cutter with a straight edge
  • 48 oz (1.4 kg) white candy coating
  • Deep, microwave-safe plastic bowl
  • 48 lollipop sticks
  • 96 red candy hearts
  • 48 red mini M&M’s
  • Red colored cocoa butter Small paintbrush
  • Toothpicks
  • Styrofoam block
STEP 1 :  Remove the cake balls from the refrigerator and shape them, one at a time, into small squares to form the shape of a box.  You can use wax paper to aid in shaping the sides. Take each side of your cake ball and slide it on a wax paper covered baking sheet. Rotate and repeat for each side to help create a flat surface. In addition, you can use the flat side of a metal cutter to cut off any rounded excess and to help form straight edges.
STPE 2 :   After shaping, put the shaped cakes in the freezer for about 15 minutes to firm up again for dipping.  Once they are firm, transfer them to the refrigerator.  Remove a few at a time for dipping, keeping the rest chilled.
STEP 3 :  Melt the candy coating in a microwave-safe plastic bowl, following the instructions on the package.  The coating should be about 3 in (7.5 cm) deep for easier dipping.
STEP 4 :  One at a time, dip about 1⁄2 in (12 mm) of the lollipop stick into the melted candy coating and insert the stick straight into the bottom of the box shape, pushing it no more than halfway through.  Dip the cake pop into the melted coating, and tap off any excess.
STEP 5 :   While the coating is wet, place two candy heart sprinkles on their sides, with pointed ends facing each other on top of the pop.  Leave room to place a mini M&M’s candy in between.  Tilt the hearts up to form the shape of a bow before the coating sets. Let dry completely in a Styrofoam block.
STEP 6 :  Heat the red cocoa butter in the microwave following the directions on the bottle.  Pour a little into a small dish.  Paint ribbons on sides and tops of the cake pop with a brush.
STEP 7 :  Let the pops dry in the Styrofoam block.